Yamaha Octane build

Tom...How big is the gap between the bottom deck and motor bed insert plate....

Butti and I were talking about this last night and trying to figure it out...


it lines up perfectly from side to side,but the plate must be too thick (there is no gap between pieces) the octane bottom hull is also pretty thick. I've ground quite a bit but don't want to go the other 3/8 inch because it will leave my pieces to thin. I've also have the thickness of glue to think about as it will raise the piece a little also

I've come across a really good solution and will be doing like kawi builds their mounts in the sxr hulls. We are working on a jig this weekend so I can place everything in the exact spot.
 

waterfreak

I had a vision!
Site Supporter
Vendor Account
Location
s florida
Very nice. I hate to do glass work.

:haha:same here! J/k!
I may have a solution for you. You can use 2 lbs closed cell foam on the bottom of the hull to make and shape your motor mounting areas. I used this technique to make my first hull and it worked out great.
Keep up the great work! :arms:
 

RoyalFlush@PCB

Shootin' The Crap
Location
PCB
Very Nice, Tom!

I knew you wouldn't last long without a ski. :sneaky:

What kind of exhaust piping will you be running?!? :biggrin:

Sorry---couldn't help myself...:rolleyes:
 
The build took a couple of steps backwards last couple of days. We could not get the interior plate to fit low enough to align the motor properly. I really wanted to use waterdawg's plate because the hard work was done and i loved the appearance of the black inner panel. But since it wasn't made for an octane I decided the work to fit the paney was going to be more than the work to go a different route.

We started with two strips of aluminum tapped for both 701 and gp800 motor mount configurations. The strips were bolted to the motor mounts and we wood shimmed the motor plates to be in the right spots to fit the yamaha motors. Once the plates were set right I glued the plates into position. The motor mounts were spaced with washers above the aluminum plate to compensate for the fiberglass thickness I'm going to lay over the plates. The glue used is the same glue polaris uses to glue their aluminum plates in.

The stand i'm using to build this works very well because each corner is adjustable and i was able to posistion the ski where the driveshaft was level and the bondlines were level from side to side. The plates are glued in the hull level and the coupler is level. The coupler spacing is even all the way around and it aligns as nice or nicer than any ski I've had.

Factory polaris octanes have just the exposed aluminum plates and glue for their motor mounting, since i have heard of the aluminum plates working loose on some of them, I decided to encase them in fiberglass to further bulletproof it. I plan on putting more glue around my plates and laying glass over the aluminum. My wamiltons hull was layed up similarily and it held up well in that area.
 

Attachments

  • stuff 029.jpg
    stuff 029.jpg
    89.9 KB · Views: 232
  • stuff 032.jpg
    stuff 032.jpg
    76.8 KB · Views: 192
  • stuff 033.jpg
    stuff 033.jpg
    82.2 KB · Views: 212
  • stuff 037.jpg
    stuff 037.jpg
    85.2 KB · Views: 166
  • stuff 039.jpg
    stuff 039.jpg
    72.6 KB · Views: 159
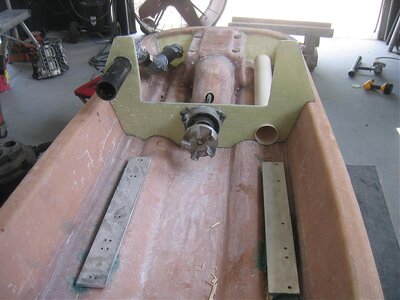
We fitted the bulkhead today and decided on exhaust placement, drain placement.

I went with a xft scupper, it seals very nice. I placed it inside the pump area because the back of the hull angle is too steep for proper sealing, I also think they last longer since they are more protected in there.

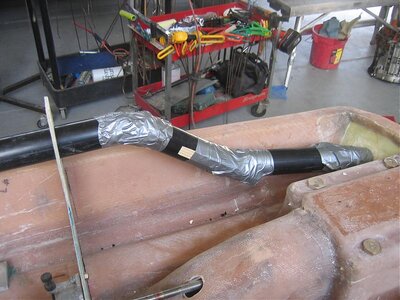
My exhaust is high quality pvc and duct tape. Lightweight and cost effective.

Not really. Its a easy way to mock up the angles I need. I took it and some aluminum pipe to the welder so he would know what i needed. I have angles in it to clear the footholds and exit at same angle as the rear of the hull (downward) to help with the noise of my motor.

Last pic is the outside glassing to cover my attached end pieces. Lots of sanding left
 

Attachments

  • octaneprogress 001.jpg
    octaneprogress 001.jpg
    62.9 KB · Views: 155
  • octaneprogress 002.jpg
    octaneprogress 002.jpg
    64.8 KB · Views: 171
  • octaneprogress 003.jpg
    octaneprogress 003.jpg
    81.1 KB · Views: 202
  • octaneprogress 005.jpg
    octaneprogress 005.jpg
    67.7 KB · Views: 145
  • octaneprogress 009.jpg
    octaneprogress 009.jpg
    46.5 KB · Views: 204
Last edited:

Matt_E

steals hub caps from cars
Site Supporter
Location
at peace
After several upside down sinking experiences, I decided not to put a scupper/one way on my Square.

We'll see how it turns out.

Anyways, great project! I rode an Octane for the first time this past weekend at Pismo (thanks Neill!) and really liked the ride. Accurate rail-like turning without leaning.
 

douglee25

m3booooy
Location
South Jersey
The motor mount setup looks sharp. I don't think you'll have any issues. Like you said, I think the fiberglass will be an added bonus after you encapsulate them. Sweet job.

Dou
 

Vumad

Super Hero, with a cape!
Location
St. Pete, FL
In the very 1st and 2nd post from this thread. Why did you cut holes in the back and glass them again? It looks like it was put back the same way it was to begin with. What did you do differently? How does that change effect the ski? I thought maybe that'd be a one way but it was put right back together. =\

I like the way you did the exhaust outlet. If I can find a hull to practice this stuff on so I don't destroy my working ski, I'm going to do it just like that.

The PVC tubing looks pretty good, but I didn't think duct tape would work for that. I think I'll do mine like that. (J/k)
 

douglee25

m3booooy
Location
South Jersey
In the very 1st and 2nd post from this thread. Why did you cut holes in the back and glass them again? It looks like it was put back the same way it was to begin with. What did you do differently? How does that change effect the ski? I thought maybe that'd be a one way but it was put right back together. =\

I like the way you did the exhaust outlet. If I can find a hull to practice this stuff on so I don't destroy my working ski, I'm going to do it just like that.

The PVC tubing looks pretty good, but I didn't think duct tape would work for that. I think I'll do mine like that. (J/k)

He shortened the tail and then reglassed the ends back on. I believe it makes the ski ride somewhat nose high and makes the ski more flickable/loose.

Doug
 
Top Bottom