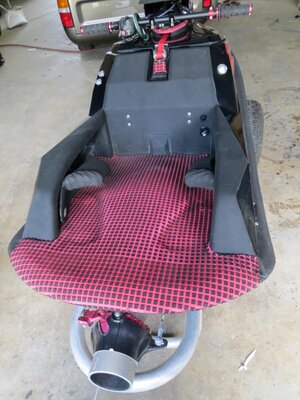
Super Jet Basic SN build !Completed! *Tuning time*

Quinc

Buy a Superjet
Location
California
Is your ac pole - 2?
If not, since you're running a shortened hull, you're going to feel more comfortable with a shorter pole, since your weight has to be more forward.

Sent from my XT907 using Tapatalk now Free

Yes it is, I am also planning on picking up some straight bars which I think should put me around -4.
 
I don't plan to start a build thread but I could...Idk..there are a lot of square builds so I really hadn't planned on it but i am taking pics. Regarding the paint gun, I have used the HPLV gun from Harbor like 15 times and still going strong. I would agree most of the stuff there is junk, but as I am not a pro painter nor did I plan to use it more than a few times it has worked out just fine.

I also picked up a poor man's scupper today for $22 at Lowes. 1.5 inch check valve with 1.5 pvc run to 2 inch reducers to 1.5 inch pvc so they'll have caps. I am also going to attache a screen to the inside to avoid anything getting stuck in the check valve and keeping it open.

My pole is currently -4 and I think it is too long. I am acutally moving my pole forward like 4 inches so I'll be more like -8. ONce you start spending more time in the footholds with the nose in the air you'll see how nice it is to have your wieght forward. Especially if you plan to put the hold in the middle of the tray. -4 is a good start though...but just a heads up. I want to move the pole mount way forward like and A/M hull but i plan to spend more time on mine now. Figured I might as well take it all the way.

I did not spray the bottom with clear, nor did I paint it. I beat the crap out of skiis so I stopped worrying so much how they look on the trailer.
 

CRJ

Hibernating
Location
Toronto
seems like we are all doing the same thing. im going drastic with my SN however, as this is a free hull to experiment with. im going around -6 to -8 off the back, and around -3 to 04 off the front with a rocker. the pole will stay in the stock spot, the front of the boat will just get shorter to bring it to the "front". already stripped down im at 82lbs no hood, with shoe. hoping to be under 100lbs with a hood when done. going super wide deck, with a fat lip at the end of 3-4". cant wait! im sure it will ride nose high, who knows might not work. worst case if the nose is too light ill drop my yami 1100 triple in it and have some fun. ill be watching your for ideas as i go.
 
seems like we are all doing the same thing. im going drastic with my SN however, as this is a free hull to experiment with. im going around -6 to -8 off the back, and around -3 to 04 off the front with a rocker. the pole will stay in the stock spot, the front of the boat will just get shorter to bring it to the "front". already stripped down im at 82lbs no hood, with shoe. hoping to be under 100lbs with a hood when done. going super wide deck, with a fat lip at the end of 3-4". cant wait! im sure it will ride nose high, who knows might not work. worst case if the nose is too light ill drop my yami 1100 triple in it and have some fun. ill be watching your for ideas as i go.

Yes we are doing basically the same thing. I cut the tray as wide as I could and am moving the holds I have up about 4-5 inches and will also do a flat lip at the back. I am taking off -4 on the back and probably -4 or 5 on the front with a rocker. Cut the hood down and ditch the huge hood filler out and do something lighter inside. This is my hull but I have access to another if I screw this up. I am also doing a 1 way valve as a cheap scupper. I have only cut and cleared out the foam. I still need to pull a few items out of the engine bay. Will most likely move the pole forward as I want to shorten it a bit but I am trying to use the same steering cable and throttle cable so I might just leave it be and have the pole cut down...as I need to have it welded (broke a weld last season). Its gonna be a long and slow build due to lack of my own time.
 

CRJ

Hibernating
Location
Toronto
lol same thing, im not even working. im going to leave the pole in stock spot and bring the nose in. i will be taking about 8-10" out of the pole. cant wait! my bottom deck will be similar to a rickter when done.
 
On the rear chop I noticed you didn't keep the end pieces as caps. I think that is what I am going to do to get the proper angle and reduce glasswork.

Any reason you chose not to do so?
 

Quinc

Buy a Superjet
Location
California
On the rear chop I noticed you didn't keep the end pieces as caps. I think that is what I am going to do to get the proper angle and reduce glasswork.

Any reason you chose not to do so?

I thought about it, but it didn't take too much glass to cover it, and I wanted it to have more angle/rocker to it.

What is "flat lip at the back" ?
 

CRJ

Hibernating
Location
Toronto
I thought about it, but it didn't take too much glass to cover it, and I wanted it to have more angle/rocker to it.

What is "flat lip at the back" ?
IMG_1041.jpg

almost like 1/3rd of the tray is a flat deck. makes it real easy to get on the ski. and theres nothing under the lip, the ski is cut back to the gunwales.
 

Quinc

Buy a Superjet
Location
California
MOAR Sanding.. Palm sanded her down to 400grit. So that is done! Just have to do one more side in the engine bay and then foot holds. YaY!
3fQqtbA.jpg

WysqrZF.jpg
 
Looking really good. I officially started the chop on mine. I took 5 inches off the back and decided not to rocker it...rather just a straight cut. Gonna be interesting because that now leaves the bottom deck under the tray to glass ass well. I was looking at yours and you did the diagonal cut which seems like it made the glass work a lot easier. When you did the inside layers did you do it will the hull sitting normally with the bottom on the stand. I can see when you did the exterior layers that you flipped her upside down.

Sanding looks good man.
 
I got a little glass laid this weekend but the interior layers are definately uglier than the exterior. I did you sand/grind down the exterior of the hull to compensate for the extra layers on the outside? or did you just blend it?
 

Quinc

Buy a Superjet
Location
California
I got a little glass laid this weekend but the interior layers are definately uglier than the exterior. I did you sand/grind down the exterior of the hull to compensate for the extra layers on the outside? or did you just blend it?

For the tail chop I sanded down around the edges of the hull with a die grinder and then filled it in when I added the fiberglass. I still had to do some blending though.


I finally finished the reinforcements! Covered the holes for the choke and fuel select. And patched the holes on the outside of the ski where the bilge and pisser fittings where. also made the mistake of sanding with a short sleeve shirt and now my arms broken out in a rash... :wall:

Still need to:
Cut holes for lowered exhaust
glass the tray
glass the gunwales
install footholds
Sand the hood
Sand the front cowl
Paint - Taking Lamar's advice and going cheap with a roll on auto paint.
Turf
Reinstall everything
 
Very nice man....but terrible news on the sleeves...did you not wetsand to keep the dust and such down? Ugh! that sucks.

So far I have:

- Cut the lowered exhaust hole and filled the old one I cut the lowered one just below the tray line as I really still want some uphill for the water to have to work upward.
- Cut the hole for the poor mans scupper and got all the components for it
- Chopped the butt and glassed on the interiorside...still need to glass the exterior to make it look good.
- Glassed / filled a few other holes I had from an experiment last season with a intake fin vs. a grate. Moving pretty quick on my end but I have not touched the sanding yet.

I took off 5 inches off the back and will probably take another 4 from the front. Hopefully she'll be a fun one to ride! Or this could be a total waste.

I am not even gonna start a list of still to do's because I will probably quit.
 

Quinc

Buy a Superjet
Location
California
Very nice man....but terrible news on the sleeves...did you not wetsand to keep the dust and such down? Ugh! that sucks.

So far I have:

- Cut the lowered exhaust hole and filled the old one I cut the lowered one just below the tray line as I really still want some uphill for the water to have to work upward.
- Cut the hole for the poor mans scupper and got all the components for it
- Chopped the butt and glassed on the interiorside...still need to glass the exterior to make it look good.
- Glassed / filled a few other holes I had from an experiment last season with a intake fin vs. a grate. Moving pretty quick on my end but I have not touched the sanding yet.

I took off 5 inches off the back and will probably take another 4 from the front. Hopefully she'll be a fun one to ride! Or this could be a total waste.

I am not even gonna start a list of still to do's because I will probably quit.

Yeah I think if there was anyone around here that did this kind of stuff I would gladly pay them to finish it. Looks like you are making good progress though!
 
meh...I am only putting an hour in here or there. I have so many things going on in my life that I am just using this as kind of an escape. I have done something pretty similar with my first build so I might have had a better idea of what to expect. I don't think I'll be done with mine until like May. I'll be stoked if I get it done sooner like Jan or Feb because the baby is due in March so I could get a ride or two in prior as I know this season is gonna be light on the riding side for me.

So ...did you not wetsand? I am guessing not..due to the rash. Sorry man...I could have saved you that rash. BTW...I am doing some work for Sierra Nevada today..I see you are in Chico.
 
Top Bottom