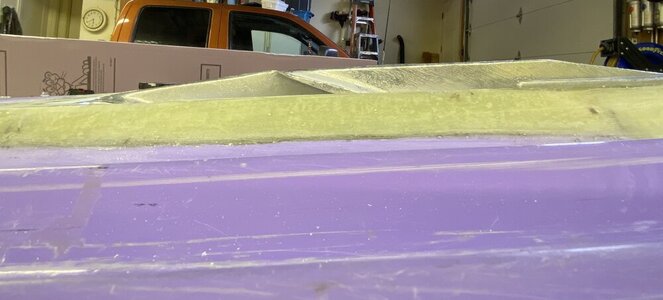
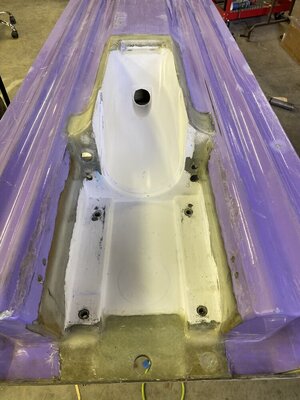
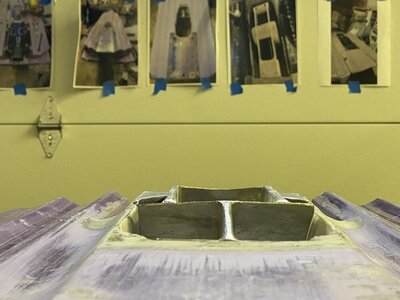
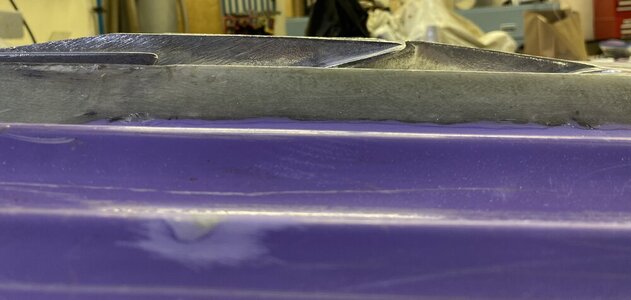
NW FX1 Build w/TOM 21 144 pump tunnel swap.

As Brapperdoodle mentioned, the lines from the pump bulkhead to the engine bulkhead should always be straight. "STUFF" will always ruin your day when "it" gets caught up in a bend somewhere. Not trying to ruin your day here...You might be lucky and never have a problem.
I do have an extra straight tube. I suppose it would be way easier to clear when straight.
I used pour foam in my first time around (bad move). Thinking I knew what I was doing, I re-used the factory aluminum cooling and bilge lines. Electrolysis and corrosion took over and created some new pin holes which in turn filled up that area under the floor mat when I was riding.
My trim/siphon tube is stainless, and my cooling lines and exhaust are aluminum McMaster said they had high corrosion resistance.
When opening my tray all of my original lines where still good and had no corrosion. However they were too short so I had to replace anyway.
I suppose the exhaust line and cooling lines should last another 20years now that they’re new?
. I had to cut the tray area out and DE-FOAM again. Replacing the OEM aluminum tubing with stainless. I ended up using 3/4" pink insulation foam cut into 3/4" squares (100's of them) and filled in the area under the floor. Water can run freely under the floor if it wants. When that floor area was still open, I added 2 small drains on the back corners (see the side view nozzle up pic in earlier post above). Pour foam is good as long as it NEVER has a chance to sit and soak in water.

I purchased some sharkthane and mixed a sample then submerged it in water overnight. It didn’t seem to take on any water. Although I’m thinking I’ll run pink foam now.
 

Flash-FX

No Square..No Round..FX-1
I also know a lot of you use 5200 for your lines. What does Yamaha use from factory?

Is 5200 easy enough to remove in the future?
Yamaha uses the green thermoset stuff that offers a little flex. As you know, it has to be chiseled or ground away.

5200 is a lot more flexible and is air cured. You can also remove that stuff with grinding/chiseling. But in some cases, like on metal surfaces, heat the base up to 250*-300* and it will bubble up on the bond area and break free.

On stainless cooling lines I use a modified epoxy slurry, thickened for no drip. Epoxy is way less expensive and does the same job...in this case. I hate to open a fresh tube of 5200 and use just one spoon full. By the time you need it again, it's all hardened up inside.
 
Trying to come up with a game plan for the rest of my build. I have all of my lines prepared, and am going to 5200 in. My exhaust is aluminum (6061) and I have aluminum l cooling lines (also 6061). I suppose I could order steel cooling lines and have them by the time I need them. But I still have an aluminum exhaust. I don’t really want to pay for another. But hell what’s another couple hundred bucks right? licoriceing skis lol. I’ve been frugal most of my life except when it comes to this thing. Oh well. Quality problems.

Flash had something about electrolysis? My oem lines lasted 28 years? So these new aluminum could be good for at least another 20? It is possibly this thing could be permanently ridden in the salt.

I don’t have the time or energy to paint my entire ski this year so at this point I’m trying to figure out what to do. I know I know it’s easier to do now than later but I don’t have the time, or the know how yet. Plus I get to get back to ripping tits and shredding on this thing.

I was thinking of rattle canning the tunnel area purple or appliance epoxy white and calling it a day. Mainly to seal it up and make it look somewhat decent so it doesn’t look like it was just slapped together. I painted a thin layer of epoxy on all exposed glass to protect from any intrusion.

So, I was thinking paint. Then install my pump shoe (once I do this I can install my mounts for my intake grate. My shoe is pre drilled and want to base those intake grate mounts off of my shoe’s permanent position. Which would be easier to do before installing lines. Once shoe is installed I can run lines and foam my tray and start laying glass.

Would like to get some idea from y’all. On the paint, as well as lines.

Take a peak at that intake grate. How’s it look?

Just want to make sure I’m doing things right, Don’t quote me on the paint lol

Thank you.
 

Attachments

  • 202B89AF-3991-46FE-A7D7-9FF9A6C91DE0.jpeg
    202B89AF-3991-46FE-A7D7-9FF9A6C91DE0.jpeg
    67.2 KB · Views: 36
  • EA78F970-B8F4-44E9-B6F4-6C74297FAFE9.jpeg
    EA78F970-B8F4-44E9-B6F4-6C74297FAFE9.jpeg
    132.9 KB · Views: 40
  • 5D3D2F18-6775-4CD2-8C6C-C3A89535D1CC.jpeg
    5D3D2F18-6775-4CD2-8C6C-C3A89535D1CC.jpeg
    109.7 KB · Views: 39
  • 0AD7BA5B-D1FD-4276-8272-8781DF2B8C4C.jpeg
    0AD7BA5B-D1FD-4276-8272-8781DF2B8C4C.jpeg
    66.9 KB · Views: 33
Last edited:

Flash-FX

No Square..No Round..FX-1
Trying to come up with a game plan for the rest of my build. I have all of my lines prepared, and am going to 5200 in. My exhaust is aluminum (6061) and I have aluminum l cooling lines (also 6061). I suppose I could order steel cooling lines and have them by the time I need them. But I still have an aluminum exhaust. I don’t really want to pay for another. But hell what’s another couple hundred bucks right? licoriceing skis lol. I’ve been frugal most of my life except when it comes to this thing. Oh well. Quality problems.

Flash had something about electrolysis? My oem lines lasted 28 years? So these new aluminum could be good for at least another 20? It is possibly this thing could be permanently ridden in the salt.

I don’t have the time or energy to paint my entire ski this year so at this point I’m trying to figure out what to do. I know I know it’s easier to do now than later but I don’t have the time, or the know how yet. Plus I get to get back to ripping tits and shredding on this thing.

I was thinking of rattle canning the tunnel area purple or appliance epoxy white and calling it a day. Mainly to seal it up and make it look somewhat decent so it doesn’t look like it was just slapped together. I painted a thin layer of epoxy on all exposed glass to protect from any intrusion.

So, I was thinking paint. Then install my pump shoe (once I do this I can install my mounts for my intake grate. My shoe is pre drilled and want to base those intake grate mounts off of my shoe’s permanent position. Which would be easier to do before installing lines. Once shoe is installed I can run lines and foam my tray and start laying glass.

Would like to get some idea from y’all. On the paint, as well as lines.

Take a peak at that intake grate. How’s it look?

Just want to make sure I’m doing things right, Don’t quote me on the paint lol

Thank you.
"Take a peak at that intake grate. How’s it look?"

That grate is way too aggressive. All you need with the 144mm pump mod is a open grate that runs flush with the bottom. Your ski will actually be faster and they'll be less stuff scooped up on beach landings. Your glass work is looking good!
 
"Take a peak at that intake grate. How’s it look?"
Thanks for the input.
That grate is way too aggressive. All you need with the 144mm pump mod is an open grate that runs flush with the bottom.
Do you have have a grate that you would recommend?

Your ski will actually be faster and they'll be less stuff scooped up on beach landings. Your glass work is looking good!

Thanks man! I tried really hard on this thing! But I definitely feel like I got the hang of it now. Had quite a bit of guidance which really helped!
 
D8E5A096-67EA-454B-AAA3-F7277E5AA161.jpeg
This may give better reference now that I have my temporary paint.

Below is a picture of my jet dynamics intake grate on my stock tunnel.


FF68D734-ED57-4DBB-8E96-8631DE9304B3.jpeg
Also sits below the ski but doesn’t have that strong of a ridge line. Has an aggressive scoop area by the ride plate.


The one for my pump swap is r&d. I think I’ll either end up grinding it down. Or trying a WORX 205
 
Last edited:
19E53675-BD85-4711-B63A-8F677E2890CA.jpegC2B44FF7-BDA7-4991-B225-FEF2BAB44BE3.jpeg5F639F59-F13C-491E-8B10-791E06018513.jpeg
Ok getting ready to install my pump shoe. Did some mock up to see how my pump seal squish worked out. Looks great. Went to line up my intake grate so I can drill the front tunnel bolt mount holes out. Everything looks good intake grate mounts flush with hull and pump shoe.

Also when running a level from pump shoe to front of tunnel everything is level and flat. No wobble or play with the surface the level runs across.
 
1E69B8FA-6D5D-4C3F-B44A-695117F5F3BD.jpegD6562109-9F8E-4477-9B65-146DB93AFB26.jpegA0BDE883-22EC-44D9-A636-3E44CA7A84CF.jpeg644C5C74-D982-43B8-97BD-3EEDAC00B948.jpegIt looks like I’m running into the same issue Sanoman did on his purple madness build. When I tighten the pump shoe intake bolts down the front of my intake grate raises.

I don’t think it has anything to do with my tunnel or install.

I checked my Stock tunnel, shoe and Jd intake grate. And it does the same thing if I tighten the pump shoe bolts. Essentially you either have to tighten them all down at the same time or work the Intake grate down by tightening the front bolts.
8F4107E3-7CCC-4AF6-AAF6-18EDC881A1F1.jpeg
31BA120B-6156-484F-BDE9-1018D688F139.jpeg95839DDD-8BBE-49A5-BEFC-9AFE40B6ABC8.jpeg

I know Sanoman ran a shim on his. I tried adding a 1-3 washers underneath the pump shoe intake grate bolts. It only increased the height on the opposite end and didn’t help the pitch any.

I can basically push it down into place. I think once I drill and install my hull inserts for the intake grate. I can install my grate and torque the bolts down in sequence and should be fine.

Another solution is to grind under the intake grate where it sits on the shoe. Or make some sort of wedge shim to sit under it…..
 

Sanoman

AbouttoKrash
Location
NE Tenn
l did have to shim the the rear of the scoop grate quite a bit.Due from not realizing “from the beginning” that the pump tunnel was low. l’m running a worx 205 grate. l didn’t have any issue with the front of the grate as you have.But not sure it would be a good idea to tighten it all down with a lot of tension on the grate and especially the inserts. l have some ideas on how to fix, but would like other opinions. @hornedogg79 what’s your take on this?

My worx 205 is quite aggressive in the current set up, but was mainly going to use this in the surf. So l want a good hook up.
 

hornedogg79

dodgin' bass boats
I ended up with an open 2 bar grate on my old f1pro. The bigger intake already sucks you down more and makes this hull feel more "hooked up". That one flash posted is cheap. You could also just cut the scoop off your worx. I would grind on the top side and shoe until it sits flush n flat in the hull.
 
l did have to shim the the rear of the scoop grate quite a bit.Due from not realizing “from the beginning” that the pump tunnel was low. l’m running a worx 205 grate. l didn’t have any issue with the front of the grate as you have.But not sure it would be a good idea to tighten it all down with a lot of tension on the grate and especially the inserts. l have some ideas on how to fix, but would like other opinions. @hornedogg79 what’s your take on this?
The grate seems to lay there perfect and flat on the shoe and hull. But starts to pivot when on the last couple “torquing” turns.


However manual says you only need 3.6 ftlbs for the intake grate. If it lays flush should be fine and not too much tension?

My worx 205 is quite aggressive in the current set up, but was mainly going to use this in the surf. So l want a good hook up.
 
I ended up with an open 2 bar grate on my old f1pro. The bigger intake already sucks you down more and makes this hull feel more "hooked up". That one flash posted is cheap. You could also just cut the scoop off your worx. I would grind on the top side and shoe until it sits flush n flat in the hull.
Just created an account and ordered one from their website. However my order history say no orders so that’s weird. Can’t go wrong for 30$

Only comes in pink too.

Might go with you color scheme @brapperdoodle
 
The grate seems to lay there perfect and flat on the shoe and hull. But starts to pivot when on the last couple “torquing” turns.


However manual says you only need 3.6 ftlbs for the intake grate. If it lays flush should be fine and not too much tension?
I also don’t understand how it could be the tunnel. Everything lines up perfectly.

What kind of shoe are you using? I’m using a worx which was pre-tapped. I had to hunt for mine due to the quality issues they were having. Ordered two. One from Australia the other from the UK.

Perhaps the holes are angled a bit?
 
So after scratching my head a bunch. I reached out to my local riding friend. Who has 2 2019 sj’s. One is stock an the other is decked out.

He was kind enough to remove his intake grate for me to use. Just as I suspected it sits perfect. I used it for my template to mark my holes as well (one thing an oem intake grate is good for ).
The front is a little tall but it sits flush and tall is an easy fix. I ran some of my Toby mounts and set in my r&d intake grate. I tightened the front down and then the shoe next. It’s sits nice and flat. No need to shim (doesn’t matter much because shimming seemed to make the problem worse when I shimmed with washers.)

Like I said my stock FX1 tunnel and jd intake grate did the exact same thing. So it makes sense that it was happening here now a bit more.

Time to glass in the inserts and run my cooling lines! ( I ordered some 3/16 and it’s here now so that’s what I’ll run!)

Hopefully this helps some of y’all.

I’ll be messing with different intake grates and reduction/steering nozzle setups. This summer


And don’t judge me for the paint! I’ve run out of time and have to finish this so I can start riding. Maybe next year!


D79AC129-B06E-419F-AC71-F12E15BF92F7.jpeg60BC7389-9BAB-4E24-BEF3-D090754DCAD9.jpegB6957474-E7FD-4FAE-B3F8-FAC978DDBE5C.jpeg8ADAABE0-24CD-444B-9372-82FAB231A33E.jpeg665D893D-EC0F-42A2-A355-4FB590F3718E.jpeg17497F47-648F-4DC2-9C5B-444212E3364D.jpeg
 
Top Bottom