You are using an out of date browser. It may not display this or other websites correctly.
You should upgrade or use an alternative browser.
You should upgrade or use an alternative browser.
Finally a Carbon/Kevlar Mod Blaster
- Thread starter Carbon Blaster
- Start date
- Location
- Mississauga
What is the resoivar on the shaft mount for? I have and only seen grease nipples did you switch to a oil? If so why and how did you convert it?
Thanks
Thanks
Polish jet pilot
4aces4aces4aces4aces4aces
- Location
- Warsaw, Poland
This is soooooo pimp! Keep up the great work!
haggis
its raining again!
- Location
- Orkney (northern scotland)
Is that the finsh straight out of moulds or do you clear coat after? either way it looks unreal!
- Location
- Australia
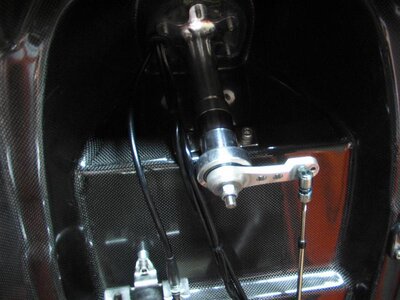
Yes it is an oil resevoir, just hadn't worked out where to mount it yet.What is the resoivar on the shaft mount for? I have and only seen grease nipples did you switch to a oil? If so why and how did you convert it?
Thanks
Changing from grease feed to oil feed bearings makes a big difference on how easily the shaft spins (or how little power is required to spin it). I have done this on all the skis I've built.
With the blaster/superjet type housing is much harder than many other housings where you just change the grease for oil & then feed it.
With the blaster/superjet setup you start with new bearing & seals, remove the shields & grease from the bearing, replace the front seal, machine a specially shaped brass ring to replace the middle seal, use the same part number seal for the back as the front, drill out the grease feed hole, machine a brass hose insert & press into housing, re-angle grease feed hole inside housing, attach a resevoir & fill it with oil.
- Location
- Australia
Thanks, some of the finishes are straight from the mold, like the early pics of the hull & the latest pics of the engine mount bases & fuel tank mounts, etc.Is that the finsh straight out of moulds or do you clear coat after? either way it looks unreal!
The carbon finish straight from the mold has a satin type finish.
The latest pics of the hull is after it has been sprayed with an industrial marine 2 pack clear.
- Location
- Australia
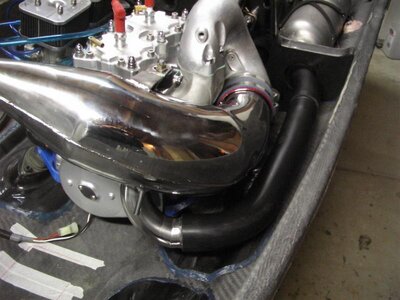
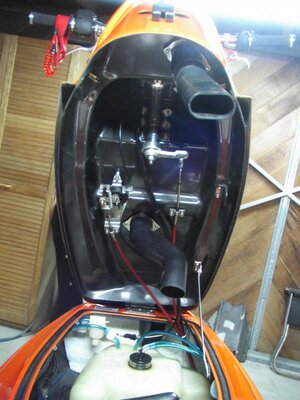
Because where running a rear mounted waterbox, we wanted to have the most direct path as possible, keep all the heat on one side & all the cool air on the carb side.
The mod chamber was modified by cutting the straight pipe coming from the centre bleed & welding on a stainless bend the same ID as the straight pipe.
A taper was formed to go from the bend to a slightly larger diameter to fit directly into the oem rubber exhaust tube.
This gets rid of heat from the engine bay & creates heaps more space in front of the motor to mount the battery. We wanted to move some of the weight forward & low, so mounting the battery here & to the bottom of the hull was a good start. The battery is mounted to one side to give better balance to the ski.
We wanted to use or modify as many oem blaster parts as possible to make it easier if someone already had a blaster. They could directly bolt-in or modify stock parts to fit the carbon blaster.
The oem rubber exhaust tube was cut into 5 pieces, piece 2 & 4 were used to make a more direct shorter tube which fits perfectly from the mod chamber through the bulkhead to the waterbox.
Attached is a pic of the modified rubber tube fitted.
Attachments


Last edited:
- Location
- Australia
More pics tomorrow!
- Location
- Australia
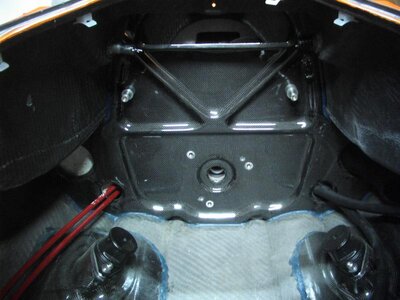
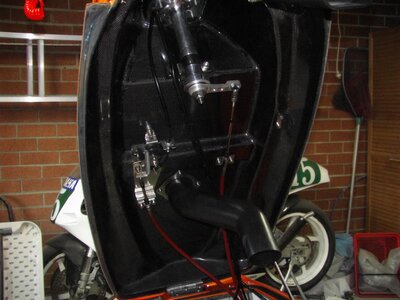
A view of the bulkhead in place after the topdeck has been bonded together.
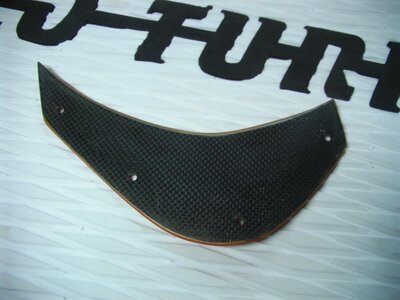
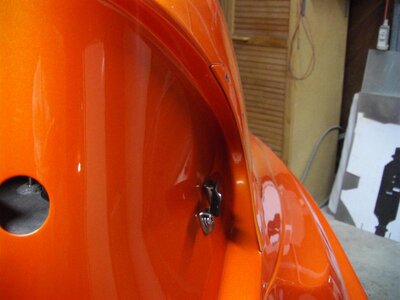
The hood has a carbon plate either side that is molded to the curves of the hood & attaches with 4 x 4mm countersunk titanium screws. These plates hold the front of the seat firmly in place & stop it from flapping around.
A recess is molded into the side of the hood for the plates to sit flush.
The hood has a carbon plate either side that is molded to the curves of the hood & attaches with 4 x 4mm countersunk titanium screws. These plates hold the front of the seat firmly in place & stop it from flapping around.
A recess is molded into the side of the hood for the plates to sit flush.
Attachments


Last edited:
dbrutherford
Parts Whore
- Location
- Fairmont, WV
That is just like that guy on eBay who sold the stainless pieces but yours are molded in. I like your idea a lot better.
waxhead
wannabe backflipper
- Location
- gold coast
I just saw the pics and im about to sneak of with them and have a moment
damn thats awesome steve great job
I havent seen it all together
damn thats awesome steve great job
I havent seen it all together
- Location
- Australia
Hope you enjoy your moment!I just saw the pics and im about to sneak of with them and have a moment
damn thats awesome steve great job
I havent seen it all together
Jay & Cambo are going to test it on Thursday morning, so where armed with 3 different length steering nozzles, a carbon extended ride plate & a fibreglass sacraficial rideplate that is 1 inch shorter than the carbon - we can keep cutting length off the fibreglass plate untill we find what works the best
str8pinned
SHAKE & BAKE
- Location
- Garden Grove
WOW! i think i just made a mess in my pants. that blaster is gonna be insane.
- Location
- Australia
More pics on their way!!
- Location
- Ct
using the best of all proven ideas to make one radical ski! awesome..
- Location
- Australia
Some more pics of the hood showing the dash to mount Tacho or similar, visor shades dash & angle is made for best view of LED screen.
Inside of hood shows UMI mounted directly to carbon & layout of both steering & trim cables.
Purple UMI bars feel good for circuit racing, but a bit low for surf (purple colour probably needs to go!)
Inside of hood shows UMI mounted directly to carbon & layout of both steering & trim cables.
Purple UMI bars feel good for circuit racing, but a bit low for surf (purple colour probably needs to go!)
Attachments


Last edited:
- Location
- Clearwater, FL
Some more pics of the hood showing the dash to mount Tacho or similar, visor shades dash & angle is made for best view of LED screen.
Inside of hood shows UMI mounted directly to carbon & layout of both steering & trim cables.
Purple UMI bars feel good for circuit racing, but a bit low for surf (purple colour probably needs to go!)
Haha. I think all black bars would look pretty sick!